A colored edge or a block is on the right side of the 3 faces (no colored piece on 1 face) -> OLL5
A colored edge or a block is on the left side of the 3 faces (no colored piece on 1 face) -> OLL6
How to learn and enjoy Rubik’s cube
A colored edge or a block is on the right side of the 3 faces (no colored piece on 1 face) -> OLL5
A colored edge or a block is on the left side of the 3 faces (no colored piece on 1 face) -> OLL6
(l’ U2 L) (U L’ U l) (Square shape at left back corner)
(r’ U2′ R) (U R’ U r) (Square shape at front right corner)
Regrettably there are not good algorithms for “Square shape at right back corner” and “Square shape at front left corner” to coincide with OLL6. So, I chose the above ones which are symmetrical procedures of OLL6.
The right AUF position for OLL5 & OLL6 is that F-face should have no colored piece, or a block “diagonally” in front of the Square shape. Then, move the 2 rows of Square shape toward it to begin the respective algorithms.
I think there are at least following 2 ways to move Back Anti-Sune. The difference is U2 or U2′ turn.
R’ U2′ R U R’ U R beginning with thumb on F-face.
R’ U2 R U R’ U R beginning with thumb on U-face.
I mostly use the precious one, to avoid re-grip at the beginning.
(r U2′ R’) (U’ R U’ r’) (Square shape at right back corner)
(l U2 L’) (U’ L U’ l’) (Square shape at front left corner)
These are one of the Anti-Sune patterns, but with double row turns for the first and last moves.
The second one uses left hand moves much, but as it is Anti-Sune relatively short & easy to turn, I prefer using it.
S’ (R U R’) S (R U’ R’) (Arrowhead at left back corner)
S (U R U’ R’) S’ (R U R’) (Arrowhead at front right corner)
I was using M’ U M U2 M’ U M for the second case, but I prefer S/S’ turns to M/M’ ones, so I changed it.
There are blocks at Fish shape tail sides-> OLL37
There are colored edges at Fish shape tail sides-> OLL35
(R U2′ R2′ F R F’) (R U2′ R’) (Fish shape head at front right corner)
There is not any valuable algorithm for the opposite position, so I use this one for all cases.
(F R’ F’ R) (U R U’ R’) (Fish shape head at left back corner)
r2′ D’ (r U’ r’) D (r U r) (Fish shape head at front right corner)
There are many algorithms which have D…D’ or D’…D pattern. For the most of the case, D’ comes after R’ turn, and D comes after R turn.
So, after you turn the rightmost slice of the cube toward you, you should move the bottom one backward by left ring finger. And vice versa for the latter case.
I think this is because the algorithm wants to keep aside UFR piece at the front or back left bottom corner while some operations of R-slice.
If you move R’ and D instead of D’, UFR piece goes to right back corner, and any R-slice move will affect it.
To avoid wrong turns, I try to avoid the algorithms of the reverse case (D comes after R’ turn, and D’ comes after R turn), if there are.
There is a block at the lower right side of Y shape -> OLL10
There is a block at the lower left side of Y shape -> OLL9
(r’ F’ r) U (r U’ r2′ F’ r) U F (Y shape head at right back corner)
(R U R’ U) (R’ F R F’) (R U2′ R’) (Y shape head at front left corner)
As for the first one, I learned the moves by L’ U’ L U L F’ L2′ U’ L U F at the beginning, which is the left hand version of the same algorithm.
(R’ U’ R U’ R’) U (R’ F R F’) U R (Y shape head at right back corner)
(R U2′ R’) U’ S’ (R U’ R’) S (Y shape head at front left corner)
For the first one, it is better to start with thumb on U-face, then the connection to the first U is smooth.
S (R’ U’ R U) (R U) (R U’ R’) S’ (any angle)
There are many algorithms, but I can turn this one faster than others.
There is a block at the lower right side of W shape -> OLL38
There is a block at the lower left side of W shape -> OLL36
(R U R2′) (F’ U’ F U) (R2 U2′ R’) (W shape stuck to left back corner)
(R U’ R’ U’) F (U R U’ R’) F’ (R U2′ R’) (W shape stuck to front right corner)
Although the second one has more moves than the first, I can turn the both in almost same amount of time. This may be because I turn R U’ R’ sequence slightly faster than R U R’.
(R U R’ U) (R U’ R’ U’) (R’ F R F’) (W shape stuck to left back corner)
(R U R’ U) (F’ U F) U2′ (R U’ R’) (W shape stuck to front right corner)
The second one has F’ U F sequence which I personally dislike. I try to use my left index finger and left thumb, or only left thumb for it, but am not good at it.
So, when U/U’ precedes F’ U F, and the trailing moves don’t become so complicated, I prefer avoiding that, using d/d’ turn.
My version is as follows.
(R U R’) d (R’ U R) U2′ (f R’ f’)
Finger trick: first U by left index finger (pushing), d by right thumb
There is a block at the side of T shape -> OLL33
There is a colored edge at the side of T shape -> OLL45
(R U R’ U’) (R’ F R F’) (T shape fallen to the right)
(r’ F’ r U) (r U’ r’) F (T shape fallen to the left)
The second one is the same as the symmetric procedure of the first one, but rewritten as a right hand version.
F (R U R’ U’) F’ (T shape fallen to the right)
f (U R U’ R’) f’ (T shape fallen to the left)
These are easy.
In upright P shape position, a bar is at the right side of P shape -> OLL44
In upright P shape position, a bar is at the left side of P shape -> OLL43
In upright P shape position, a block is at the right side on F-face -> OLL32
In upright P shape position, a block is at the left side on F-face -> OLL31
(R’ U’ F) U (R U’ R’) F’ R (upright P shape & a colored edge on L-face)
S’ (r’ F’ r) (U r U’ r’) f (upside down P shape & a colored edge on R-face)
Finger trick for the first one: F’ by left index finger (Michael Trigger)
The second one is the same as the symmetric procedure of OLL32 (S’ L’ U’ L U L F’ L’ f), but rewritten as a right hand version.
r (B U’ B’) (r’ U r) U r’ (upright P shape & a colored edge on R-face))
S (R U R’ U’) (R’ F R f’) (upside down P shape & a colored edge on L-face)
Finger tricks for the first one: B’ by right index finger, last U by left index finger (pushing U-face)
F’ (U’ L’ U L) F (upright P shape & a bar on L-face)
f’ (L’ U’ L U) f (upside down P shape & a bar on R-face)
I use symmetric procedure of OLL44, since they are easy turns even for my left hand.
F (U R U’ R’) F’ (upright P shape & a bar on R-face)
f (R U R’ U’) f’ (upside down P shape & a bar on L-face)
There is no need to mention about these easy algorithms.
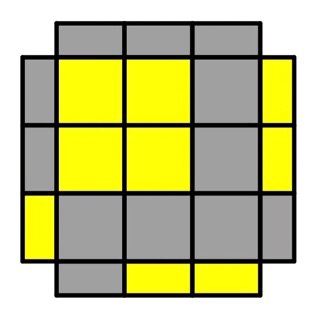
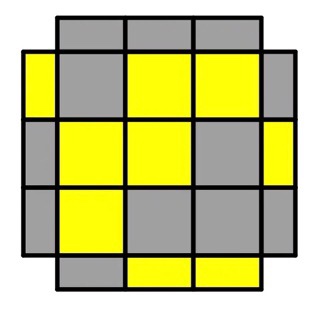
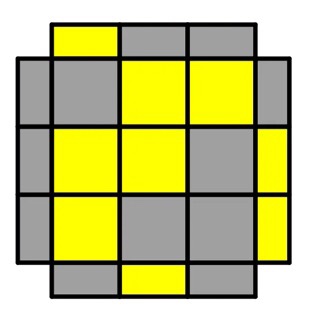
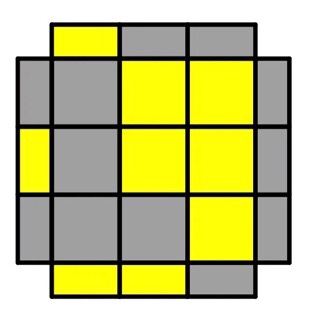
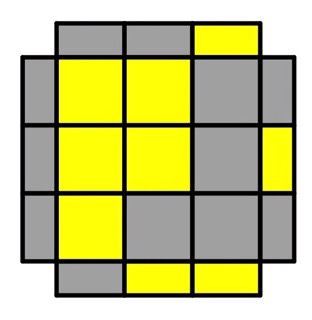
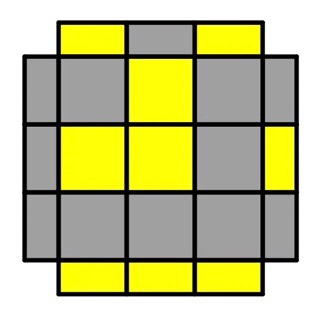
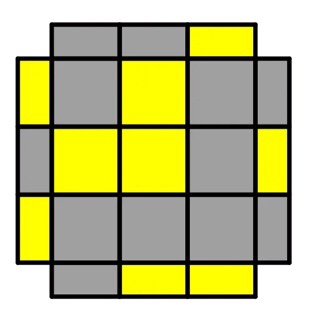
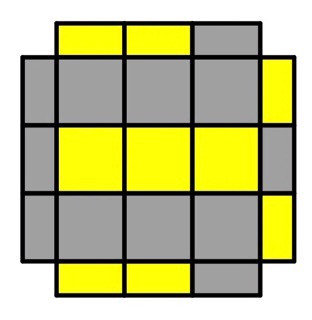
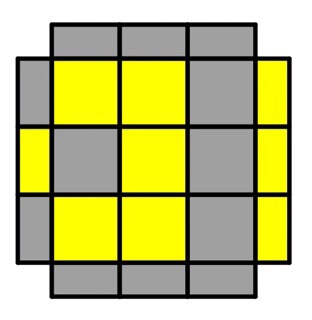
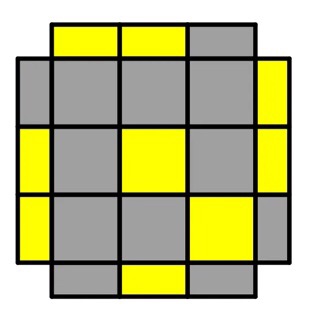
There is a block at the side of recess of Knight Moves shape. And in the horizontal center line position, URB or UFL is colored-> OLL13
All are same as above, except that ULB or UFR is colored-> OLL14
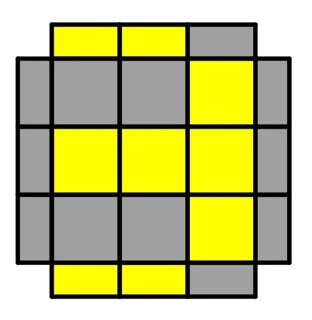
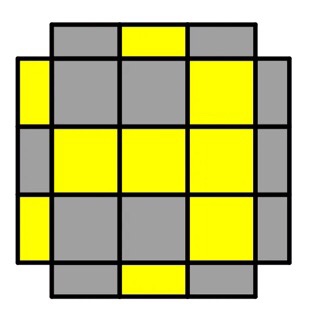
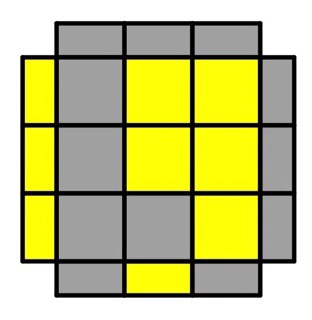
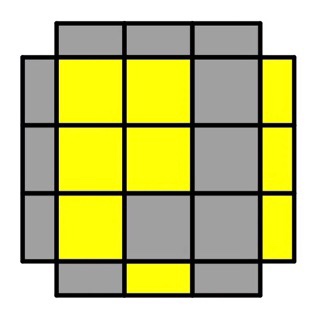
There is a colored edge at the side of recess of Knight Moves shape. And in the horizontal center line position, URB or UFL is colored-> OLL16
All are same as above, except that ULB or UFR is colored-> OLL15
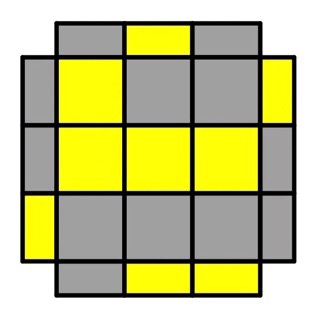
(R’ F’ R) (r’ F’ r U) (R’ F R) (horizontal center line & a colored ULB)
(r’ U’ r) (R’ U’ R U) (r’ U r) (horizontal center line & a colored UFR)
It is smooth if you use Michael Trigger for F’.
As for (r’ U r), I use my left index finger to turn U, pushing ULB piece.
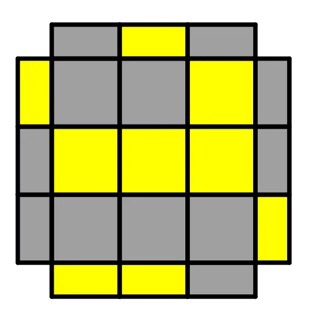
(r U r’) (R U R’ U’) (r U’ r’) (horizontal center line & a colored URB)
(R’ F R U) (R’ U’ F’ R U’) (R’ U2′ R) (horizontal center line & a colored UFL)
The second algorithm is 3 moves more than the first one, so it is not a waist of time to adopt a half turn AUF & the first one in case of upside down. Having said that, I myself prefer using the second one.
If you are good at left hand moves, the following mirror method may be the option.
(l U l’) (L U L’ U’) (l U’ l’)
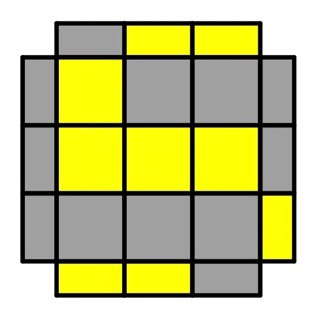
(r’ U r) U (r’ U’ r) (f R’ f’) (horizontal center line & colored ULB)
(R’ F R) U (R’ F’ R) (F U’ F’) (horizontal center line & colored UFR)
R’ F R move is Sledgehammer without last F’. For R’ F’ R move, it is better to use left-index-finger F’ (Michael Trigger).
For F U’ F’, I use my right thumb to move F-face down and up. using right index finger and thumb to move it down and up may be the normal style, but this needs regrip.
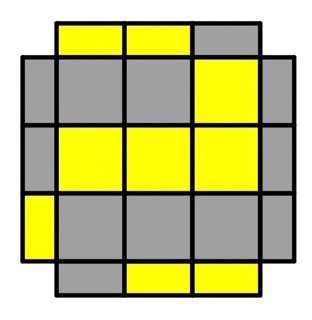
f (R U R2 U’) (R’ U R U’) f’ (horizontal center line & colored URB)
F (U R U2′ R’) (U’ R U R’) F’ (horizontal center line & colored UFL)
For the first one, R U R2 move is a little tricky. I put my thumb on D-face during f move. Normal R U. And here comes R2. I put my index finger on UBR piece and move it to DFR by only that finger. After this, my thumb is over U-face, not B-face.
That makes the following moves easy without regrip.
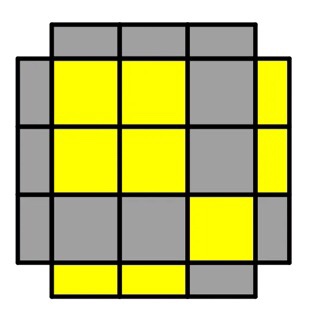
(r U2′ R’) (U’ R U R’) (U’ R U’ r’) (L shape at upper left portion of U-face)
The first and last moves are double row turns. The others are pretty normal.
l’ U’ L U’ L’ U L U’ L’ U2 l (L shape at upper left portion of U-face)
I adopted this algorithm which uses left hand intensively. As I wrote in my other article, I was using mirror algorithms by left hand when I started to learn OLL, and I left some of them even after I changed the approaching method.
I have found the following one for right hand which is very easy. I may use this later.
F (R U R’ U’) (R U’ R’ U) (R U R’) F’
R’ F R2 B’ R2′ F’ R2 B R’ (L shape at upper left portion of U-face)
This has 3 half turns (R2/R2′), and F/B’/F’/B appear alternately before and after them, so it is very rhythmical.
Finger technic: B’ by left index finger, pushing ULB piece, F’ by the same finger, pulling UFL piece. F and B by right index finger (normal way)
To speed up the half turns, it is good to turn the slices of the cube in opposite direction by both hands. Instead of moving R2 and R2′ by only right hand, move Lw R’ and Lw’ R respectively.
With this way, you can move each of them by a quarter turn speed.
(F R’ F2) (R U2′ R) U2′ R’ F (L shape at upper left portion of U-face)
It has double trigger 3 times, of which I use right hand for F2 and left one for U2′.
One move (R/R’) follows these double triggers, so this algorithm is very rhythmical.
F (R U R’ U’) (R U R’ U’) F’ (L shape at upper left portion of U-face)
Sexy move (R U R’ U’) 2 times between F/F’. Pretty easy.
(F R’ F’ R) U2′ (R U’ R’ U) (R U2′ R’) (L shape at upper left portion of U-face)
My way to use my fingers for Hedgeslammer is as follows.
F: right thumb, R’: normal turn, F’: left index finger, R: normal turn
F’ turn using left index finger is called Michael Trigger.
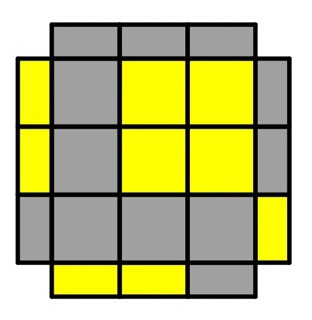
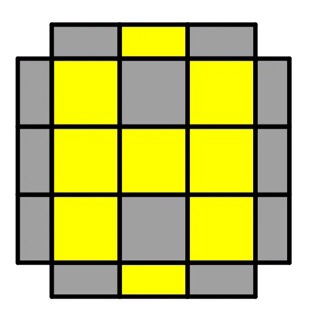
There are 6 OLL’s of L shape (47, 48, 49, 50, 53, and 54). It is necessary to find out which it is.
At first, I divided them into 3 pairs, based on its mirror relationship. So, 47 and 48, 49 and 50, 53 and 54 are mirrors respectively.
I put the first one of the pairs (47, 49 and 53) at upper left portion of U-face, and the second one at upper right portion.
And I adopted the mirror method using by my right and left hands.
But with this method, I needed to position them correctly after looking for “key” (bar, headlight, etc.) and understanding if it is a original or mirror.
So, I changed my method. I position all of them at the upper left portion, and distinguish them looking at F&R faces as follows.
F-face / R-face -> OLL No.
colored edge / block -> OLL47
block / colored edge -> OLL48
bar / block -> OLL49
block / bar -> OLL50
colored edge / bar -> OLL53
bar / colored edge -> OLL54
I don’t use algorithms for their opposite position (lower right portion of U-face), to avoid confusion. So, I will show only one algorithm I use for each OLL.
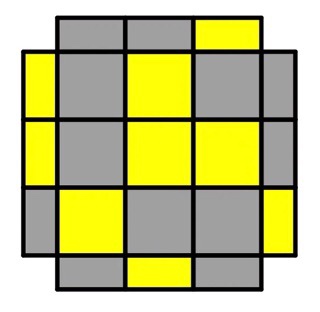
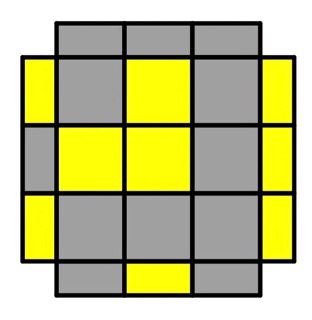
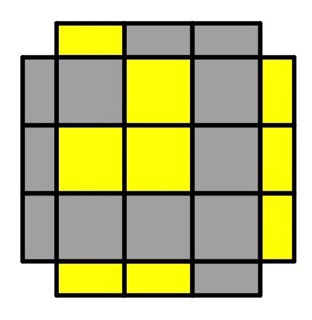
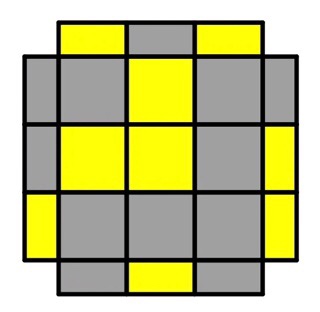
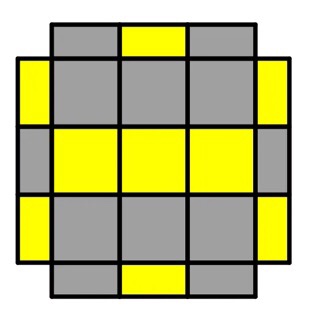
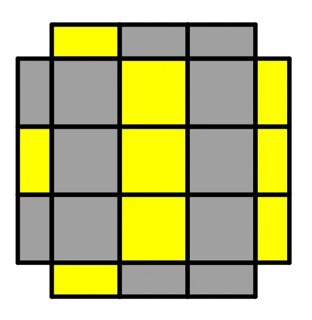
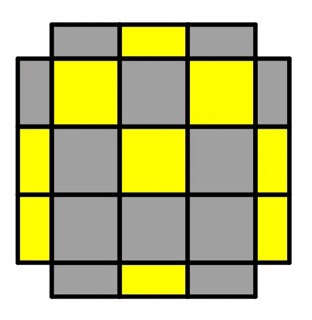
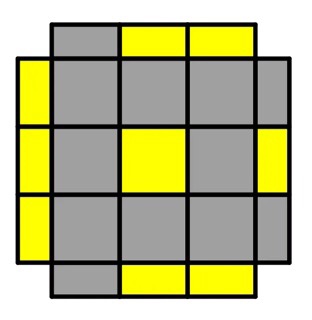
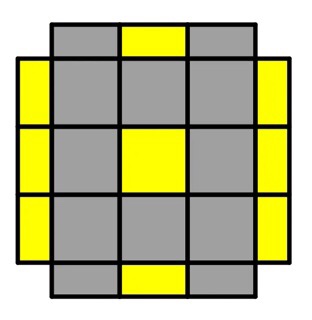
There is one bar -> OLL52
There are 2 bars -> OLL55
There are 2 blocks -> OLL51
There are 2 Headlights -> OLL56
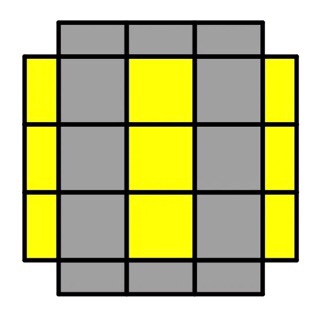
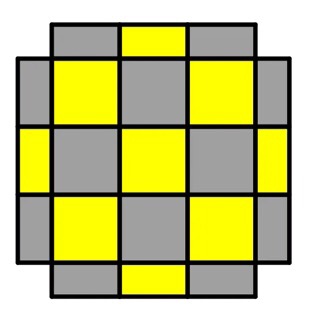
(R U2′ R2) (U’ R U’ R’) U2′ (F R F’) (vertical I shape)
(F U’ R2) D (R’ U2 R) D’ (R2 U F’) (horizontal I shape)
I use both of these, although the first one is a little easy for me because for the second one I need to use my ring finger to turn the last U, in which sometimes it is caught.
(r U r’) (U R U’ R’) (U R U’ R’) (r U’ r’) (horizontal I shape & Headlight on R&L-faces)
(R U’ R2′ r) (U’ R U’ R’ U) (r’ R2 U R’) (horizontal I shape & Headlight on F&B-faces)
Although these are long algorithms, are not so complicated and can be rhythmically turned.
(R2′ r) and (r’ R2) are same as (R’ M’) and (M R) respectively, but I think the former is smooth and compares favourably with the latter in speed.
F (U R U’ R’) (U R U’ R’) F’ (horizontal I shape & Headlight on R-face)
f (R U R’ U’) (R U R’ U’) f’ (horizontal I shape & Headlight on L-face)
These two algorithms are of the same pattern, starting and ending with Z-axis turn, sexy/inverse sexy moves 2 times in the middle.
(R’ U’ R U’ R’) d (R’ U R) B (vertical I shape & bar on R-face)
R’ (F’ U’ F U’) (R U R’ U R) (vertical I shape & bar on L-face)
For the first one, I start with right thumb on U-face, and use it for the d turn. I regrip to turn R’ U R, and use index finger for B.
For the second one, the last U would be smoothly turned with ring finger.
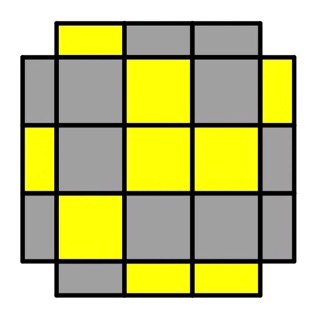
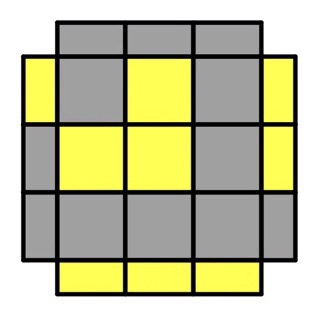
(R U R’ U’) M’ (U R U’ r’) (vertical H shape)
(R U R’) S’ (R U’ R’) S (horizontal H shape)
I use the first one, but have just found the second one, which is easy, so I will use both from now on, by which way I can omit AUF.
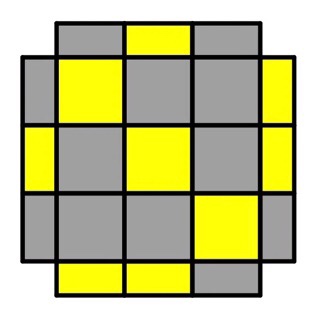
There is a colored edge on the side face of the opposite side of C-shape -> No 34
There is a bar on the side face of the opposite side of C-shape -> No 46
R2′ D’ (R U’ R’) D (F R F’) U R (C-shape looking at left side)
(f R f’) U’ (r’ U’ R) U M’ (C-shape looking at right side)
f R f’ move is a side version of “trigger” (R U R’). I often use this move in F2L stage, instead of rotating cube when EO is not correct.
I was using the other algorithm (R U R’ U’) (f’ U’ F U) S (C-shape looking at front side) for a long time, because of its less moving count.
But I decided to change my algorithms, considering the easiness of AUF when I encounter C-shapes (OLL46 or 34) after F2L.
At that time, I had to see first if it is OLL46 or 34 (looking for a bar at the side face) and then applied the respective AUF, whose process was taking me time.
Now, I immediately position the C-shape to look left or right for both of OLL cases, and I look for a bar during AUF.
R’ U’ (R’ F R F’) U R (C-shape looking at left side)
r’ U’ (F R’ F’ R) U r (C-shape looking at right side)
The first one has a Sledgehammer and the second one has a Hedgeslammer. These are short algorithms and easy to turn.
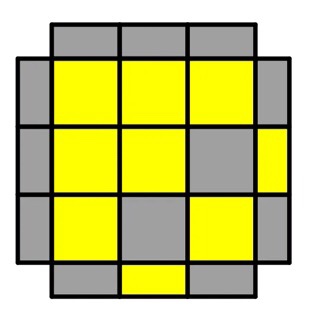
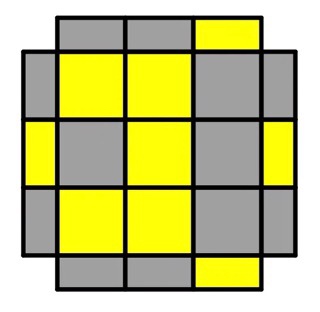
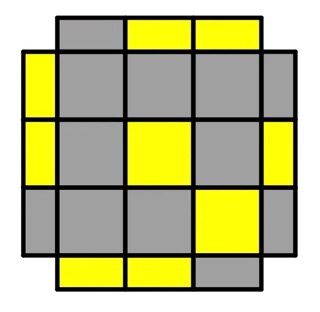
There is a bar and one colored piece on the side face of the opposite and adjacent side of the U-face’s triangle figure respectively -> No 18
There is one colored piece and a block on the side face of the opposite and adjacent side of the U-face’s triangle figure respectively -> No 19
M U (R U R’ U’) M’ (R’ F R F’) (triangle figure on the far side of U-face)
M’ U’ (R’ U’ R U) M (R B’ R’ B) (triangle figure on the near side of U-face)
The second one is the upper and lower symmetry of the first one. The backside
Sledgehammer (R B’ R’ B) may be a little tricky at first, especially the last “B” turn, but not so difficult after some practice.
You can make it, putting your right index finger on UR edge piece to avoid S-slice move and turning B-face by your left middle, ring and pinky fingers. The tip is to move the B-face by pinky finger, pushing the left side of it.

(F R’ F’ R) U2’ (F R’ F’ R) (U’ R U’ R’) (triangle figure on the far side of U-face)
(F R U R’) d R’ U2’ (R’ F R F’) (triangle figure on the near side of U-face)
The first one uses a Hedgeslammer two times, and is easy to turn.
The second one has fewer moves, but is a little harder. I use my right thumb for F and d, and left (not right) index finger for U.
(F R’ F’ R) U (S’ R U’ R’ S) (backslash on U-face and a block on F-face)
F R’ F’ R move is called Hedgeslammer, which is a reverse procedure of Sledgehammer (R’ F R F’).
S’/S are easy turns (for me easier than F/F’ turns).
I was using the algorithm (R U R’ U) (R’ F R F’) U2’ (R’ F R F’) for the opposite position, but I found out I can move the other one faster, even with 2-quarter turn added. So, currently I use only one algorithm for all cases.
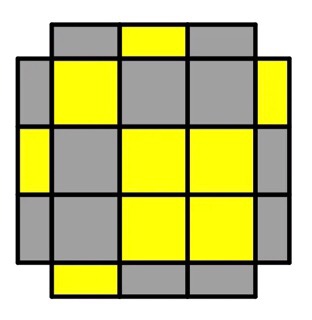
3 side faces have U-face-color block at the right side, and 1 side face has that colored edge -> OLL3
3 side faces have U-face-color block at the left side, and 1 side face has that colored edge -> OLL4
So, after F2L finished, in the 75% of the case, you see U-face-color block on the F-face and recognize which OLL is.
If you happen to encounter one colored edge on the F-face (25% chance), you can recognize them as follow.
A corner dot on the U-face is at the down right corner -> OLL3, or down left corner -> OLL4.
M U’ (r U2’ r’) U’ (R U’ R’) M’ (dot on UFR corner)
M’ (R’ U’ R U’) (r’ U2’ r) U’ M (dot on UBL corner)
OLL3 and OLL4 are in a symmetrical relationship. So, one easy way is to use the symmetrical algorithms of OLL3 as follows.
f’ (L’ U’ L U) f U F’ (L’ U’ L U) F (dot on UFR corner)
F’ (U’ L’ U L) F U f’ (U’ L’ U L) f (dot on UBL corner)
But these are not so “kind” for me, right-handed, so I didn’t adopt them. I wish I were an ambidextrous.
In my option, if you write in reverse the first one letter by letter, it will be the second one.
f (R U R’ U’) f’ U’ F (R U R’ U’) F’ (dot on UFR corner)
F (U R U’ R’) F’ U’ f (U R U’ R’) f’ (dot on UBL corner)
There are 4 positions of a corner dot (UFR, UBR, UBL, or UFL), so I chose one algorithm each for FR and BL corner dot cases. When you come upon other case, only 1 quarter turn is enough to execute one of these two.
There is a similar algorithm F (U R U’ R’) F’ U F (R U R’ U’) F’ for the second one, but I prefer the above mentioned one because it has the 2 same movement (U R U’ R’).
One face has a bar, and its adjacent face has a U-face-color edge -> OLL1
One face has a bar, and its adjacent face has U-face-color block -> OLL2
F (R U R’ U’) S (R U R’ U’) f’ (bar on L-face)
f (U R U’ R’) S’ (U R U’ R’) F’ (bar on R-face)
After F2L completed, one of these algorithm is used depending on the U face direction. Then, you can avoid 2-quarter turn!
Also, these are reverse procedures, so it is easy to memorize them.
(R U2’ R2 F R F’) U2’ (R’ F R F’) (bar on R&L-faces)
This is a symmetrical case, so I use only this one. It has Sledgehammer (R’ F R F’) two times and easy to turn and memorize.
Although I don’t use the following one, it is also easy to turn. Interestingly if you change r U’ r’ to r U r’, that is one of the algorithms for OLL2.
(R U’ R2’) D’ (r U’ r’) D (R2 U R’) (bar on F&B-faces)
